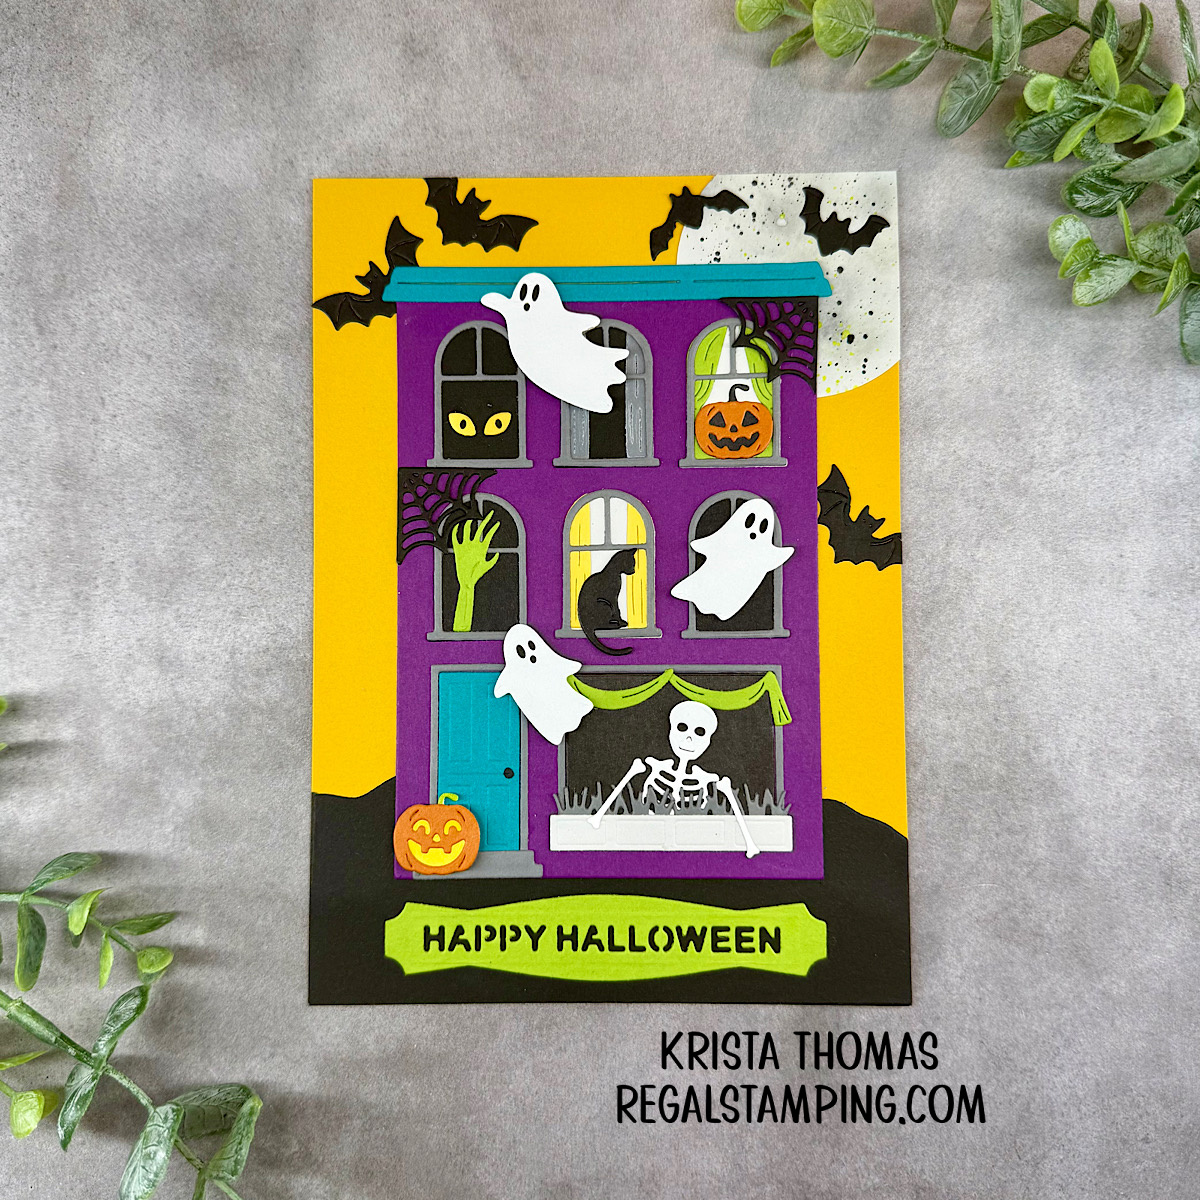
I always get excited when a designer expands on an existing collection, so I couldn’t wait to play with Yana Smakula’s newest addition to her City Holiday series- Halloween City Holiday! The original City Holiday released last year, was all about Christmas. I loved creating festive storefronts and cozy holiday scenes and this latest release gives that same building a spooky makeover.
I’m playing along with a challenge #835 from Just Us Girls, and their requirement is to use any die. I’m using a bunch of dies!

Today’s card is a little larger than my usual A2 size, measuring 5″ x 7″. I needed the extra space to bring my idea to life and have room for all of the spooks!
I built a festive Halloween house complete with pumpkins, ghosts, and a bat-filled sky. So, let’s break it down, shall we?
Start with a color combo

I began by looking through the bold & bright category of my Color Cube, box 1, settling on card #053, shown in the next photo. I matched its colors with Spellbinders ColorWheel Cardstock and settled on the following colors:
- Tuscan
- Bees Wax
- Terra Cotta
- Rain Forest
- Teal Topaz
- Violet
- Classic White
- Fog
- Anchor
- Raven
I ended up not using any red, as was shown on the Color Cube card.
Creating the base

I cut a 5″ x 7″ panel of Tuscan ColorWheel Cardstock for the base. Using the landscape die from City Holiday, I cut the ground from Raven and glued it to the bottom of the Tuscan panel. I think making the sky yellow is perfect for a spooky scene!
I used a 2 1/4″ circle punch to make the moon, punching it from white cardstock. I randomly sponged some gray ink on the circle, in the hopes that it would resemble the moon. To give it a bit more texture, I splattered black paint onto it, along with some lime green which is really subtle.
Once the paint splatters were dry, I positioned the circle onto the upper right corner of the card base. I trimmed off the portions that went off the top and side.
A Halloween moon isn’t complete without some bats flying around, so I used the bat dies from Halloween City Holiday, as well as from Halloween Hugs: Drac. These bats were then placed in front of the moon and randomly in the sky.
Building a haunted house
Now came the really fun part–making the haunted house! I die-cut the house base from Violet cardstock with the door and roof from Teal Topaz. All of the framing and steps were cut from Anchor.
Curtains were cut from Bees Wax, Rain Forest and vellum, giving variety to each window. Because a haunted house never has the lights on, I cut the inside portion from Raven. In the end, I changed my mind and decided that two windows should have the lights on, so they were cut from Fog. This allowed me to place a black cat, from City Holiday, in one of the lit windows.
Adding the spooks

Once the haunted house and all of it’s windows were assembled, it was time to add all of the Halloween spookiness! This is where it really got fun. 🙂
Once again, I used dies from Halloween City Holiday to cut the spider webs, ghosts, eyes, jack-o-lanterns, skeleton, and creepy hand. I played around with placement until I was happy, then started gluing everything into place. The ghosts are popped up with foam tape.
I had so much fun deciding where each little detail should go. Each spooky piece brought the scene to life, while each window reveals something different.
A little something for the inside

I glued the front panel with its cute scene to black card base. This was perfect for my idea of adding a big moon on the inside! I die-cut a large circle from Fog cardstock and then smudged and splattered it the same as for the moon on the card front. The sentiment is from the Clear Stamp of the Month, Trick or Snark, as was stamped in black ink. I decorated around the moon using more ghosts and creepy eyes from the Halloween City Holiday set. And now my card was complete!
Summing it up
Whether you’re a fan of haunted houses, charming storefronts, or simply love creating detailed scene cards, I think this collection is going to be a favorite. Be sure to check out the Awnings & Window Additions to this collection too, as well as my previous City Holiday card.
Thanks so much for stopping by today. I hope this card inspires you to dust off your scene-building dies and create a Halloween city that’s full of frightful fun and festive charm. Happy crafting!
~Krista
This post contains affiliate links. If you follow a link and make a purchase, then I may receive a small commission at no extra cost to you.
Supplies Used:
 Halloween City Holiday Shop at: SP |
 City Holiday Shop at: SP | SC | AM |
 Everyday City Awnings & Windows Dies Shop at: SP | SC |
 Halloween Hugs: Drac Shop at: SP |
 Tuscan ColorWheel Cardstock Shop at: SP | SC |
 Terra Cotta ColorWheel Cardstock Shop at: SP | SC |
 Classic White ColorWheel Cardstock Shop at: SP | SC |
 Bees Wax ColorWheel Cardstock Shop at: SP | SC |
 Rainforest ColorWheel Cardstock Shop at: SP | SC |
 Teal Topaz ColorWheel Cardstock Shop at: SP | SC |
 Violet ColorWheel Cardstock Shop at: SP | SC |
 Fog ColorWheel Cardstock Shop at: SP | SC |
 Anchor ColorWheel Cardstock Shop at: SP |
 Raven ColorWheel Cardstock Shop at: SP | SC |
 Platinum 6 Machine Shop at: SP | SC | AM |
 Color Cube Bundle 1&2 Shop at: SP |


Discover more from Regal Stamping
Subscribe to get the latest posts sent to your email.
Super fun, colorful, haunted house! Awesome use of the dies. Thanks for sharing at JUGS
Thank you, Vicki! I love using dies so it was a blast to join in the fun!
Super fun and fabulous creative colourful card Krista. Thanks for sharing at JUGS.
Thank you, Ina! The design team’s cards were very inspiring and I enjoyed playing along!