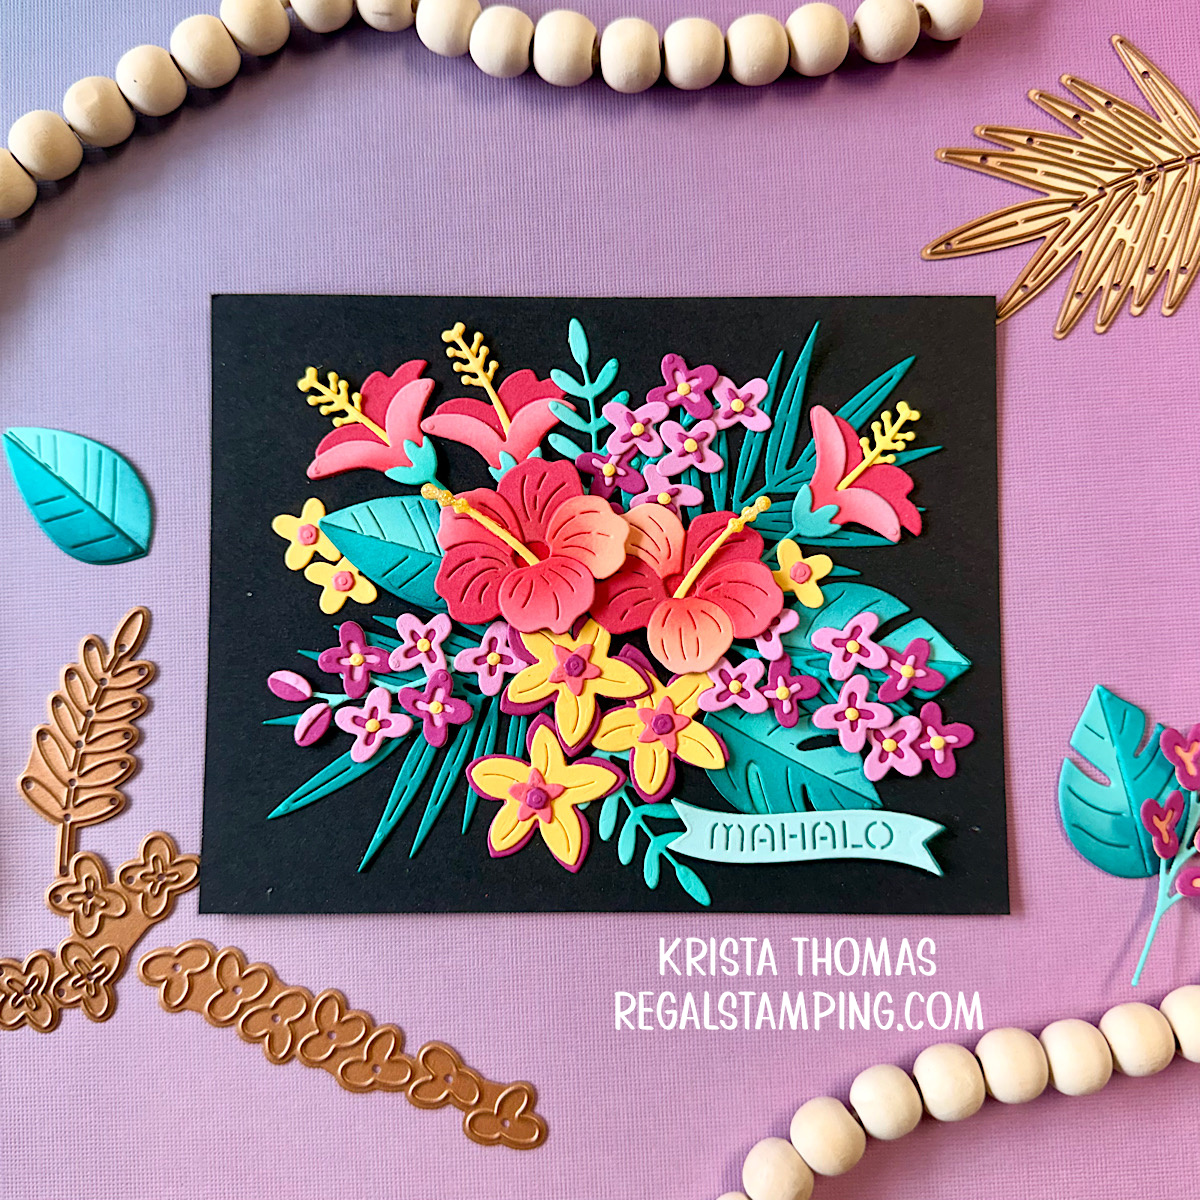
Mahalo, crafty friends! Today I’m sharing how I created this colorful floral spray using the Spellbinders Large Die of the Month: Tropical Blooms. There’s something so striking about vibrant florals against a bold black background. The contrast makes every petal and leaf stand out, creating a card that feels both elegant and tropical.
This die set is packed with possibilities, featuring individual flowers, flowering branches, and a variety of leaf shapes that can be mixed and matched to create endless botanical arrangements. For this card, I wanted to build a lush tropical bouquet that looked like it was overflowing with color and texture.
Step 1: Choose a Tropical Blooms Color Palette
Start by choosing a color scheme, with 3-5 flower colors, including multiple shades of the same color, and 2-3 foliage colors. Using different shades of the same color will work well for flowers with multiple layers. Spellbinders offer a gorgeous array of colors in their ColorWheel Cardstock line.
The colors I used are listed below, from left to right:

Step 2: Die Cut Your Tropical Blooms Elements
Begin die cutting a generous assortment of flowers and foliage. One of the things I love about this set is the variety it offers. I cut several individual blooms, a few flowering branches, and multiple leaf styles from brightly colored cardstock.
Don’t worry about having a plan just yet- having plenty of pieces gives you flexibility when it’s time to build your arrangement.
Shown below are the dies laying on the cardstock colors they were cut from for my card.

Die cut multiples of each die, so that you’ll have plenty to work with.

I made a template or guide to help me remember how these largest flowers go together. I keep it stored with my dies, so that in the future it’ll be handy!

Notice that some of the dies are laying on both shades of purple. These were cut from both colors multiple times.
Step 3: Add Dimension
Before assembling, add dimension to your die cuts by gently shaping the petals and leaves with a bone folder or shaping tool. Slightly curling the petals and bending the leaves gives the finished arrangement a natural, organic look.
Another option is to add dimension using ink blending to lighten or darker areas. This is what I did, using Distress Oxide Inks.
Layer flower centers and petals where applicable to create even more depth and visual interest.
Step 4: Build the Foundation
Place your black card panel on your work surface and begin with the largest leafy elements. Arrange them so they fan outward from the center, creating the framework for your floral spray.
Think of the leaves as the skeleton of the arrangement. They establish the overall shape and help guide where the flowers will be placed.
Step 5: Add the Tropical Blooms
Next, tuck the larger flowers into the foliage. Spread them throughout the design to create balance and movement. Once the larger blooms are in place, fill gaps with smaller flowers and flowering branches.

Varying the colors and sizes helps create a fuller, more natural bouquet. Don’t be afraid to overlap elements—layering is what gives the arrangement that lush tropical feel. Also feel free to add other elements from die sets you might have. I could easily have added different or additional leaves as shown in this previous post: Free Hugs Oscar.
Step 6: Fill and Refine
Continue adding leaves and smaller accents until the arrangement feels complete. Look for any empty spaces and fill them with smaller pieces of foliage or blossoms.
The goal is to create a full floral spray with plenty of texture while still allowing each element to shine.
Step 7: Let the Colors Pop
The real star of this card is the dramatic black background. The dark backdrop allows every bright flower and leafy detail to stand out, making the tropical colors appear even more vibrant.
It’s a simple design choice that creates a huge impact and instantly elevates the finished card. Finally, add a sentiment if desired. I used a “Mahalo” banner from the June Small Die of the Month, Mahalo Sea Turtle.
I also added some Stickles Glitter Glue-Star Dust to the stamens of the two largest flowers. This added a tiny bit of sparkle without over-powering the tropical blooms.
Finishing Thoughts
The Tropical Blooms Large Die of the Month makes it easy to create stunning floral arrangements with just cardstock and a little layering. By combining the various flowers, flowering branches, and leaf options, you can design anything from a simple bouquet to a full tropical garden.
And when paired with a bold black background, those bright blooms truly steal the show! I hope this tutorial helps as you create gorgeous floral sprays in your crafting adventures!
Let me know if this tutorial was helpful and if you’d like to see more posts like it. I appreciate you and thank you for taking the time to drop by!
~Krista
This post contains affiliate links which means if you click on a link and make a purchase, then I receive a small commission at no extra cost to you. Thank you in advance for your support!

Discover more from Regal Stamping
Subscribe to get the latest posts sent to your email.