Purse charms are having a major moment right now—and I’ll admit, I had no idea! That is, until my daughter-in-law showed up one day carrying a handbag covered in the cutest little charms. That said, once I got a glimpse of how fun and playful these accessories are, I couldn’t resist jumping in. Enter the Tote-ally Awesome Collection from Hero Arts—such a delightful set that captures all the charm (literally!) of this trend.
Apparently, this trend has been everywhere, and I was completely out of the loop. But honestly, at this stage in life, keeping up with every trend isn’t exactly at the top of my to-do list… ha!

What’s Your Tote Preference: Patterns or Plain?
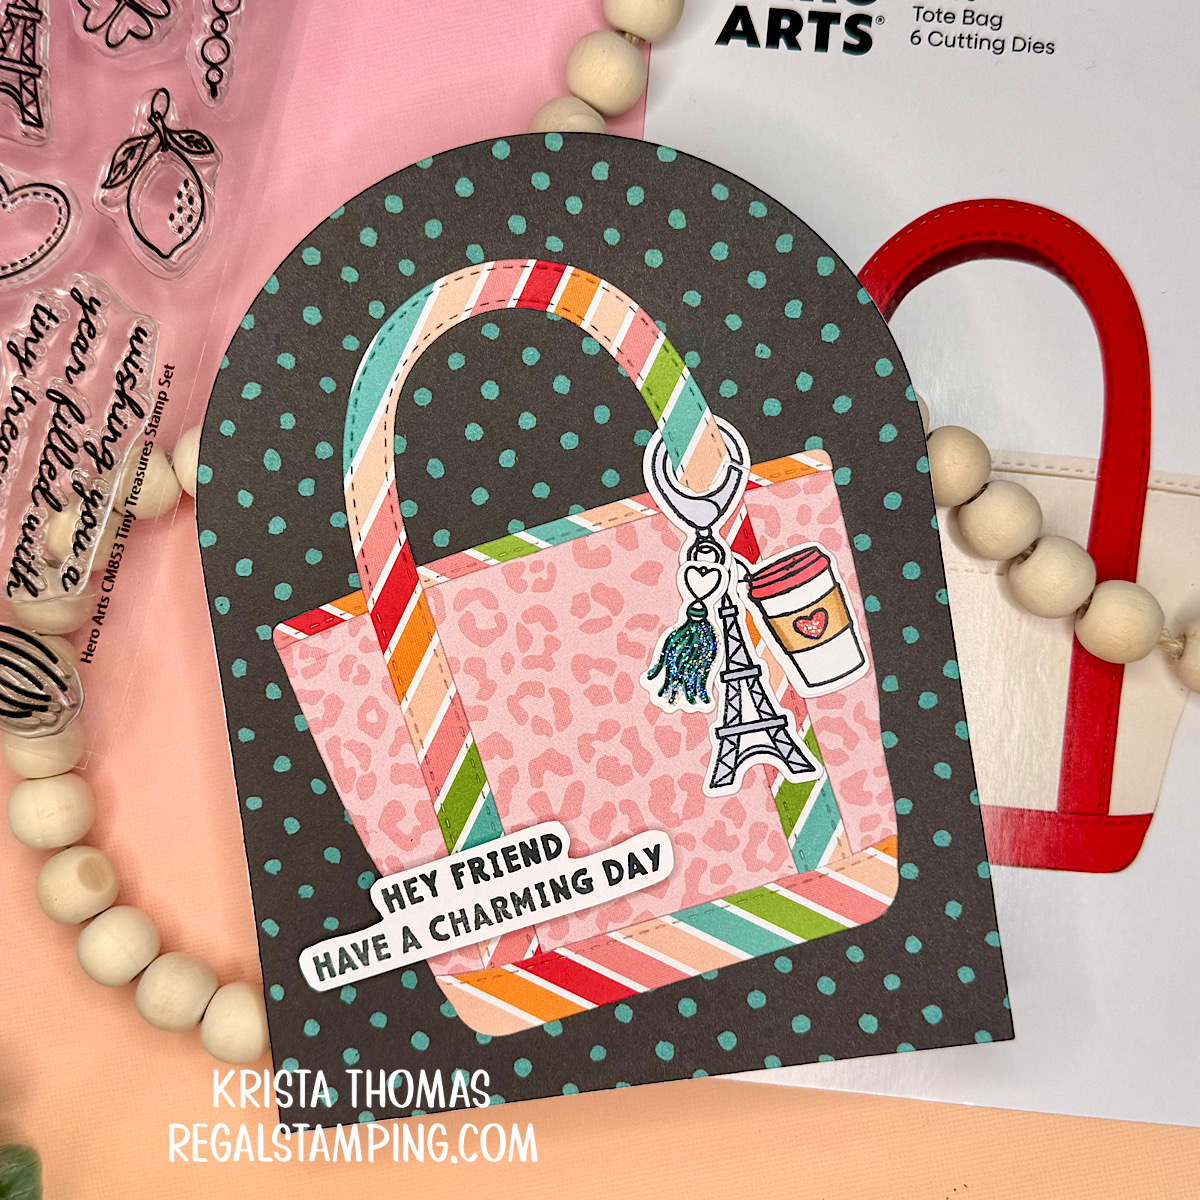
For today’s card, I started by die-cutting the Tote Bag Dies from some pink leopard print paper I had in my stash. I’ve seen some gorgeous purses made from bold patterns and I thought this one was perfect! The handle and accents were cut from some striped paper that complements the leopard print. Gluing the tote together is quick and easy, especially since I didn’t add the pocket.

Tote-ally Awesome Purse Charms
Next, I stamped a page full of charms with the Tiny Treasures Stamp Set and then cut them out with the coordinating dies. This set is a must-have part of the Tote-ally Awesome Collection, with its cute purse charms and punny sentiments!
Using Ohuhu Alcohol Markers, I colored the “Tote-ally Awesome” charms. After coloring, I added some glitter and then chose a few favorites to add to the tote. I snipped the opening of the key ring so that it could wrap around the tote strap. This gave it a realistically hanging look. I arranged and then glued three charms in place.
Once the tote was complete, I searched my paper stash for a background and discovered a black piece with teal polka dots. This seemed like a perfect fit for the tote!
Creating a Shaped Card Base
I used the largest die from Spellbinders Essential Arches to cut the background, as well as two more to create the card base. I used the “hinge” method, as shown in this post, to connect the card base pieces. After gluing the background piece to the card base, I adhered the tote at a slight angle.
Finally, I stamped a sentiment from the Tiny Treasures Stamp Set and used scissors to it out.
There’s No Age Limit to Creativity!
This project reminded me that creativity doesn’t have an age limit—and sometimes, the best inspiration comes from the younger generation. Whether you’re fully trend-savvy or just discovering what’s “in,” there’s always room to make it your own in a way that feels authentic and fun.
So yes, I may have been late to the purse charm party—but I’m definitely enjoying it now!
Thanks for visiting today, and I hope you get crafty!
~Krista
*This post contains affiliate links which means if you click on a link and make a purchase, then I will receive a small commission at no extra cost to you. Thank you in advance for your support!

Discover more from Regal Stamping
Subscribe to get the latest posts sent to your email.
Cute. I don’t have many of these – just a hand sanitizer one LOL.
You’ve got the important one!