I love having options, don’t you? They are what keeps life interesting! What to have for dinner, what to wear, which movie to see or book to read. Without options, life would be boring. As crafters, we also love having options, right? So today I’m going to show you two beautiful fuchsia cards made in completely different ways!
Die cutting or Stenciling…That is the Question
Luckily, Spellbinders offers many options for their recent release, Magical Fuchsia Bundle, and they can be used together or separately. Today I will share a stenciled version as well as a die cut option.
Fuchsia Cards: The Stenciled Option

This first card was super quick to make! I started with a Classic White panel and used the Magical Fuchsia Press & Foil Plate with the BetterPress System. Once I had centered the plate on the magnetic chase, I then inked it up with black ink.

The white panel was secured onto the platen with temporary tape and placed over the chase.

After running this through my die-cutting machine, I had a beautifully detailed image.

I then cut it out with its coordinating die.

Let the Stenciling Begin!
Placing the embossed piece onto a Waffle Flower Grip Mat, I was ready to begin stenciling! I have the original grip mat, which is clear and very stained. The new ones are black and won’t show the stains! This is a must-have tool when stenciling, as it keeps everything in place.
The stencils are numbered in the bottom left corner, so I began with #1, lining up the first flower parts with the stamped image. I used Altenew Pink Diamond ink with a blending brush for smooth application.

With stencil #2, I used Altenew Rubellite and Razzelberry inks. Notice the splotchy areas where the stencil is sticking to the Grip Mat…it works SO well!!

With stencil #3, I used Pinkalicious ink. I love that Altenew sells these colors as a set!

Continuing on, I chose two green tones, Altenew Grass Field and Shadow Creek inks with stencils #4 and 5. Number 5 also includes the flower stamens, and I reverted back to Pinkalicious for them. After completing the stenciling, I set the flowers aside.


In the next step, I placed the die-cut image into the Magical Fuchsia 3D Embossing Folder, lining up the inked image with the folder image. I carefully closed the folder and ran it through my die-cut machine. After removing the panel from the folder, I admired the beautifully embossed flowers.


Soft and Subtle for the Background
I wanted a soft, subtle background for this card and chose Classic White and Seaside ColorWheel Cardstock. Starting with a white A2 sized panel, I textured it with Dimpled 3D Embossing Folder and glued it to a folded white card base.

Next, I used a die from Color Block Accent Arches, cutting it from Seaside cardstock. To make a white mat for this piece, I used a coordinating die from Essential Arches. After gluing the Seaside arch to the white arch, it was time to put it all together!
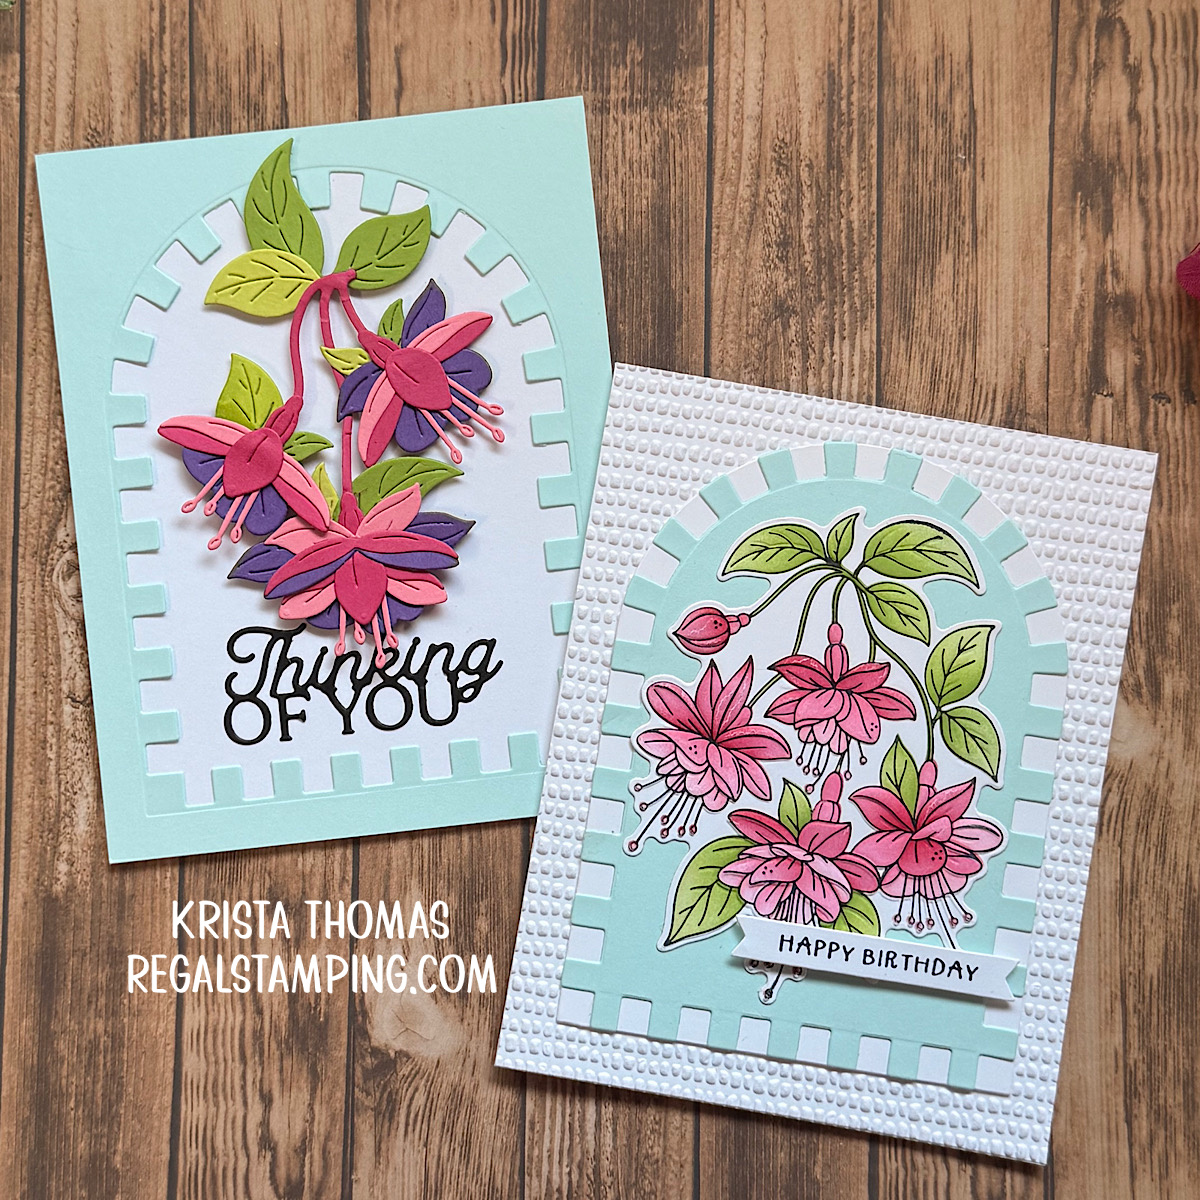
The arches were glued to the card base, and then I added the stenciled fuchsias on top. Finally, I popped up a sentiment, “happy birthday” that was made with Seed Co. Border, which is April’s Press & Foil of the Month.
Fuchsia Cards: The Die-cut Option

Creating cards with the Magical Fuchsia Etched Dies is a bit more labor intensive than with stencils, but totally worth the effort! My first step was to choose the colors and I went with bold and bright by selecting Tutu, Wild Berry and Lilac ColorWheel Cardstock. For the leaves, I chose Peridot and Rainforest.
After spending some time die-cutting the pieces, it was time to assemble the flowers. I basically followed the guide offered by Spellbinders, piecing together three blossoms.
Repeating a Soft and Subtle Background
The background for this card came together quickly, as I used the “left over” Color Block Arch panel from the previous card. I glued this frame piece to a white card base which left a perfectly sized opening for the fuchsia arrangement. I used dimensional foam dots to pop up the flowers, leaving room for the die cut sentiment. This was cut from Raven ColorWheel Cardstock with Essentially Yours Sentiment Die: “Thinking of You”.

Which Fuchsia Option Do You Prefer?
Whether you like the stencil version or the die-cut version, I hope I’ve inspired you to create some springtime flower cards. I’ve been having so much fun making colorful flowers, like today’s fuchsias, or my previous pansies and lilacs. Life is great when we have options!!
~Krista

Discover more from Regal Stamping
Subscribe to get the latest posts sent to your email.
These are SOOOOO pretty!!
Thank you so much, Lori!