There’s something magical about the first signs of spring—fresh blooms, longer days, and bright colors returning after winter. That same feeling is beautifully captured in the Yana’s Windmills and Tulips Press & Foil Plate. This product is made to work beautifully whether you prefer hot foiling or the BetterPress system. Today I’m only using the BetterPress, so let’s talk about that!
BetterPress: Step by Step
If you’ve never used the BetterPress System, please keep reading!

The BetterPress System embeds the image into your paper and leaves a crisp, detailed impression. It’s really simple to use but it has some weirdly named parts like “Chase” and “Platen”. You can simply think of them as “base” and “clear plate”. 🙂 Here are step by step instructions to help you!
- Cut a 4.25″ x 5.5″ panel of BetterPress Paper, set aside
- Place the Press & Foil plate onto the BetterPress Chase, which is the magnetic base
- Ink up the Press & Foil plate with Black BetterPress Ink which is waterproof
- Use some Best Ever Craft Tape to secure the cardstock panel to the Platen.
- Turn the Platen over so that the cardstock is facing down and secure it’s four magnetic corners to the Chase.
- Place into a die-cutting machine and run it through. This process pushes the ink into the paper.
- Remove from die-cutting machine and remove the Platen from the Chase.
- Remove the cardstock panel from the Platen and admire the gorgeous impression!
Two Cards with Windmills & Tulips
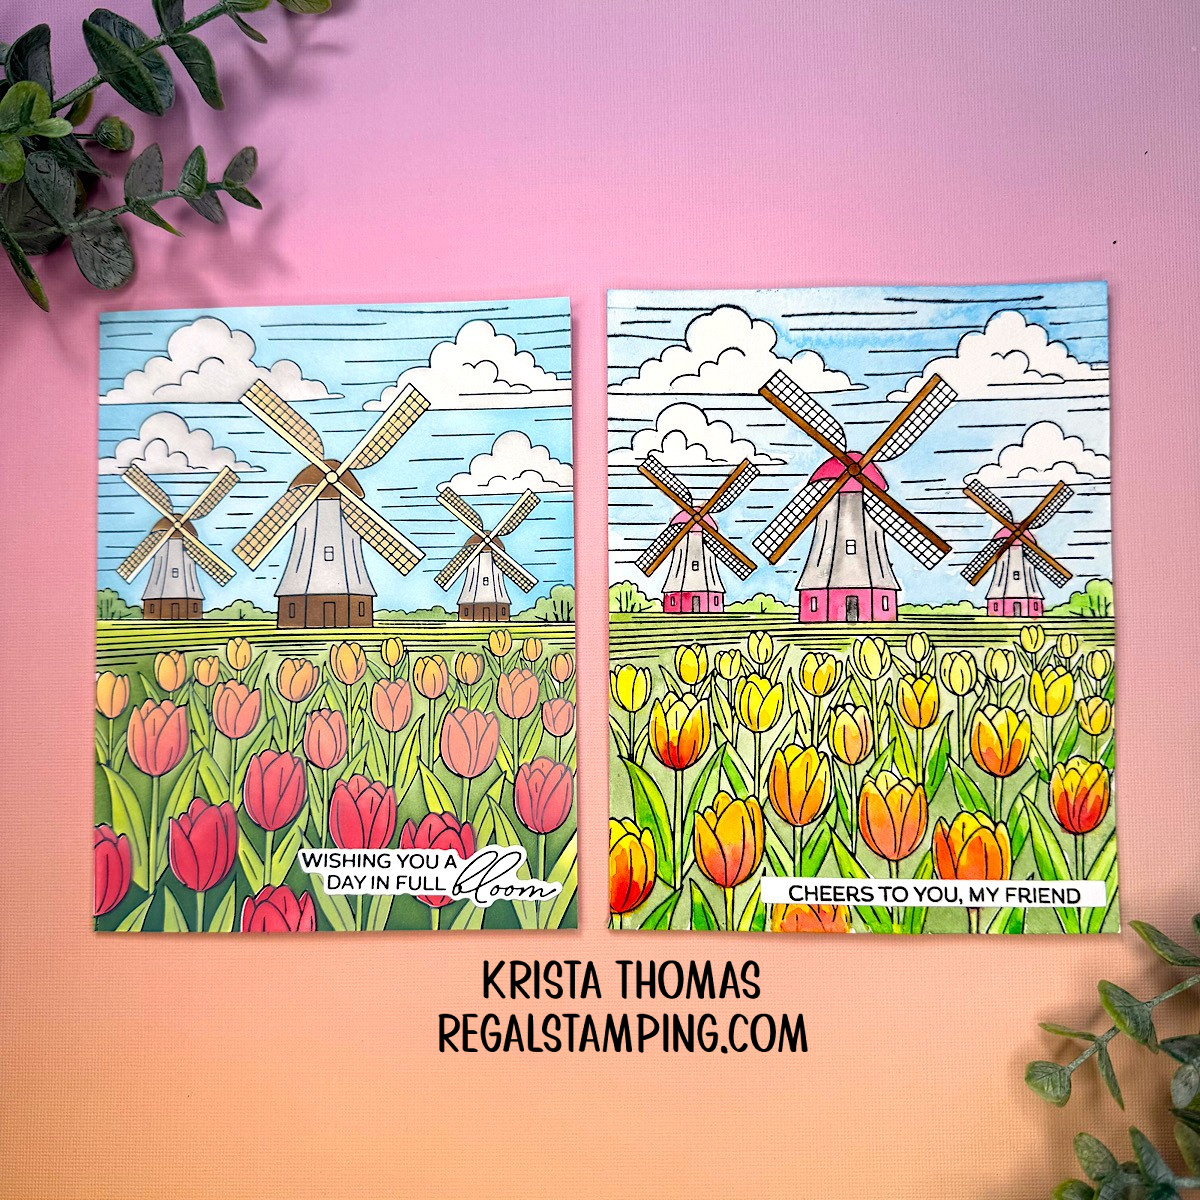
Today I’m sharing two cards using this new Windmills & Tulips Press & Foil plate. For both cards, I used the Betterpress system and BetterPress black ink. However, they were colored very differently! Let’s take a closer look.
Windmills & Tulips Stencils Make it Easy: Card #1

I wanted to use the coordinating Windmills & Tulips Stencils, so for this first card, I used White ColorWheel Cardstock. This smooth cardstock allows for a nice ink blending process with the stencils.
Following the BetterPress instructions from above, I pressed the Windmills & Tulips Press & Foil Plate image onto my cardstock.
I then placed the panel onto my Waffle Flower Grip Mat and began the stenciling process. The grip mat holds everything in place while I work and it’s one of my “must-have” tools! There are six stencils in the set, so I worked through them numerically. It’s handy to have some Post-It notes for covering parts as you work with different colors.
I used a variety of Distress Oxide Inks to color my panel. Since these inks are somewhat opaque, it softens the crispness of the black inked images, and that’s okay!

I then added a sentiment that reads “Wishing You a Day in Full Bloom” which is from February’s From Ink to Petal BetterPress Club.
The end result is beautiful, if I do say so myself! I love how quick and easy this card went together, but I wanted to try my hand at watercoloring this beautiful scene. With that in mind, let’s take a look at my second card.
Watercolors Make it Dreamy: Card #2

Since I knew I’d be watercoloring this card, I used Porcelain BetterPress Paper which is perfect for this medium. It’s thicker than regular cardstock and has a texture to it which grips the watercolors.
Once again, I went through the BetterPress steps from above and transferred the image to my paper.

I used a Water Brush with my watercolor paints and slowly colored in the scene. It’s important to allow for drying time in between colors to prevent bleeding, which means that this process certainly takes longer than stenciling. I think the end result is worth the wait!
I added a sentiment from Nearest & Dearest stamp set, that reads “Cheers to you, my friend”. This will work for a variety of occasions including birthday, hello and more!
For another fun way to use watercolors, see my previous post: A First-Class Hello
To summarize
These two cards feature the same design but were brought to life using two completely different coloring techniques.

It’s always fun to see how the same design can look completely different depending on the coloring technique used. Both approaches highlight the design in their own unique way and show how versatile it can be. Which one do you prefer?
Thanks for visiting today!
~Krista
Follow me:Discover more from Regal Stamping
Subscribe to get the latest posts sent to your email.