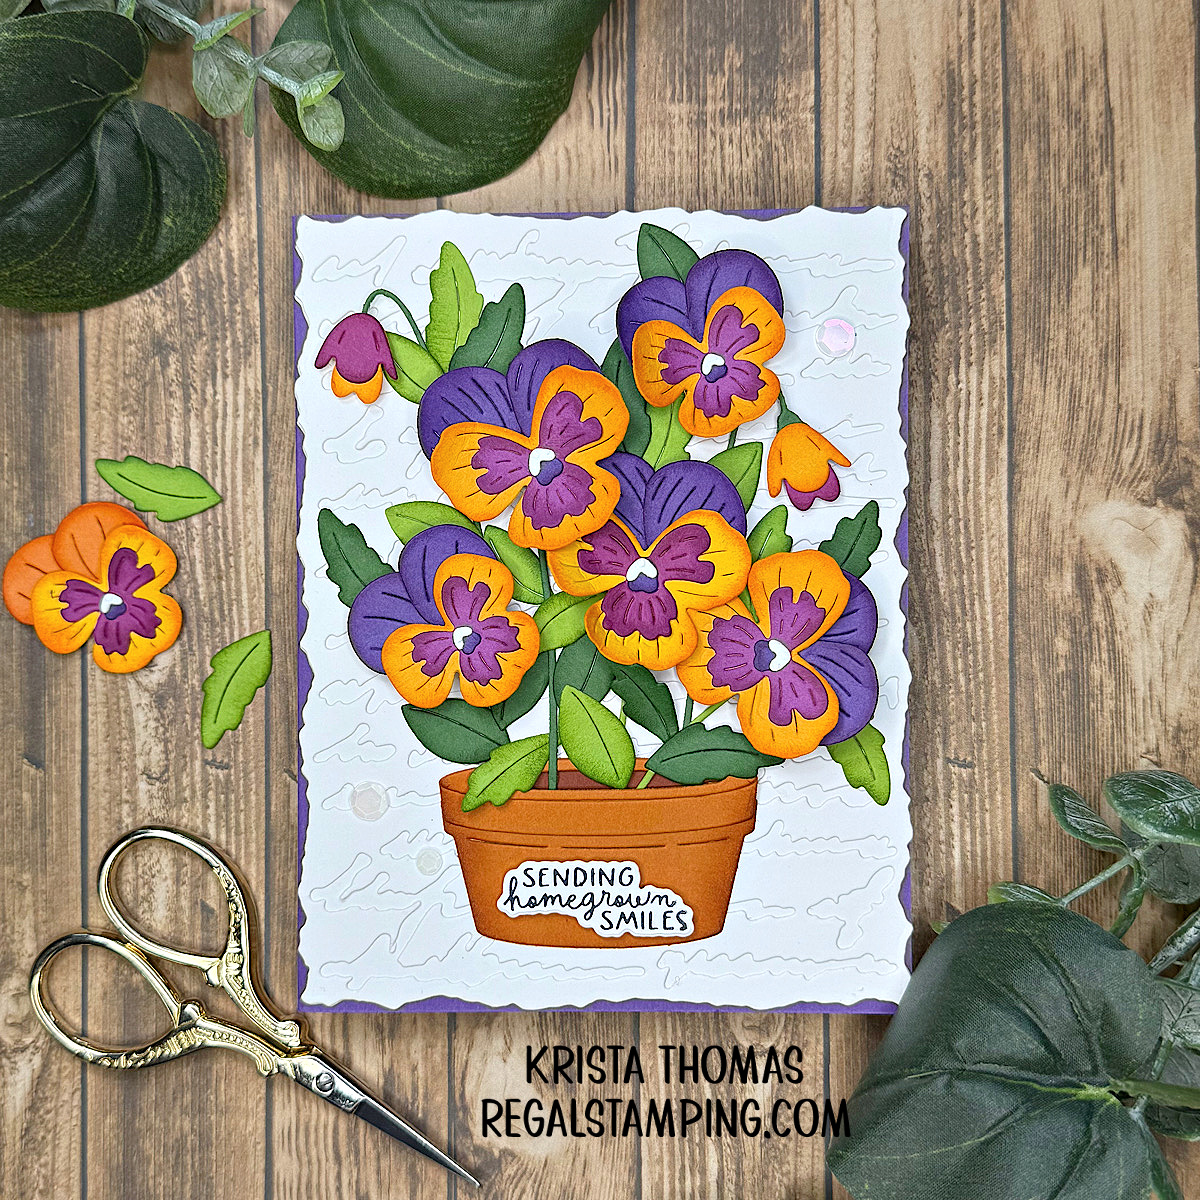
Hello crafty friends! I’m planning a trip to our local nursery this week, with the goal of planting some gorgeous pansies by my front door. With cool weather still prevailing, these flowers are hardy and will no doubt thrive. Since I’m in a pansy mood, I decided to create today’s project which features the beautiful Pansy Seed Co. dies, Spellbinder’s Small Die of the Month. I brought this bold pansy card to life in a vibrant palette of bright mango and rich purples, which is one of my favorite pansy colors.
Making a Subtle Background
Because I knew the pansies would be dramatic, I chose a more understated approach for the background—but “simple” doesn’t have to mean “flat.” Using the Deckled Edge Script die, I built up layers of white-on-white texture. This technique adds visual interest without competing with the focal elements. The soft script pattern and gently torn edges create dimension and movement, catching the light in a way that makes the background quietly dynamic. The white layers were added to a Lilac ColorWheel Cardstock panel measuring 5.5″ x 4.25″, which was then adhered to a folded card base.

Layering white cardstock is one of my favorite ways to add elegance to a project. It allows the eye to rest while still offering plenty to look at. In this case, it acts as the perfect stage for those bold pansies to perform.
Making the Pansies
Step 1: Choose the pansy colors. Listed below are the colors I chose:
- Saffron ColorWheel Cardstock for the flower bases and buds
- Mulberry ColorWheel Cardstock for the base accents and buds
- Lilac ColorWheel Cardstock for the additional petals
- Lilac and Classic White ColorWheel Cardstocks for the centers
- Rainforest and Fern ColorWheel Cardstocks for the stems and leaves
- Terracotta and Cinnamon ColorWheel Cardstock for the pot
Step 2: Die-cut the pieces. I like to place the pieces in a dish so that I don’t lose any and I always cut extra, just in case!
Step 3: Use your favorite coordinating ink pad colors with finger daubers to gently ink the edges of everything except the white centers. This step is time-consuming but worth the effort!

Step 4: Begin assembling the flowers, curling the petals inwards with your fingers or a bone folder to add dimension and realism. I prefer liquid glue for this process, and I recommend Art Glitter Glue, because it dries clear and holds very well. Set the assembled flowers aside.
Step 5: Assemble the clay pot, leaving the opening unglued on the bottom edge. This will allow the stems to be inserted for a realistic planted look.
Step 6: Glue the flowers and buds to stems. Don’t worry if the stems don’t reach all the way to the pot, as they can be hidden behind some leaves.
Step 7: Play with placement, before gluing! Start by arranging the pansies against the card base, tucking stems into the pot if they’re long enough. Don’t worry about the leaves just yet.
Step 8: When you’re happy with the arrangement, carefully add glue to the back of the pot and press to adhere. Gently lift each flower and add a foam square to the backside. Now you can start adding leaves, tucking them wherever you like and covering stems that were too short to reach the pot.
Step 9: Add a sentiment! I used the Press & Foil of the Month, Seed Co. Border with the BetterPress System. After pressing the sentiment with black ink onto white cardstock, I used the coordinating die to cut it out. Finally, I popped it up with foam squares and placed it front and center on the flowerpot.
Step 10: Add some bling because every card deserves to shine! I used some Aura Opalescent Sequins for some subtle sparkle.

Result: A Fabulous Pansy Card!
The final result is a card that feels perfect for Springtime, full of vibrant flowers and rich texture. And now I’m excited about my upcoming trip to buy pansies and get my hands dirty! LOL!! Have you planted anything yet this year?
Thanks for visiting today! For more Spring flower inspiration, see my previous post, Wishing You a Day in Full Bloom.
~Krista
*This post contains affiliate links. If you click on a link and make a purchase, then I will receive a small commission at no extra cost to you. Thank you in advance for your support!

Discover more from Regal Stamping
Subscribe to get the latest posts sent to your email.