I’ve been diving into some serious crafting fun and creating scenes from the ocean with Ahoy, Matey—the brand-new Stitching Club Dies for June! 🌊⚓ This month’s club collection is a total treasure trove of ocean/nautical-themed delights, and guess what? It’s available to new subscribers starting TODAY!
As someone who finds pure joy by the sea, I couldn’t not go all in—I had to snag the whole caboodle. No regrets! 🐚✨
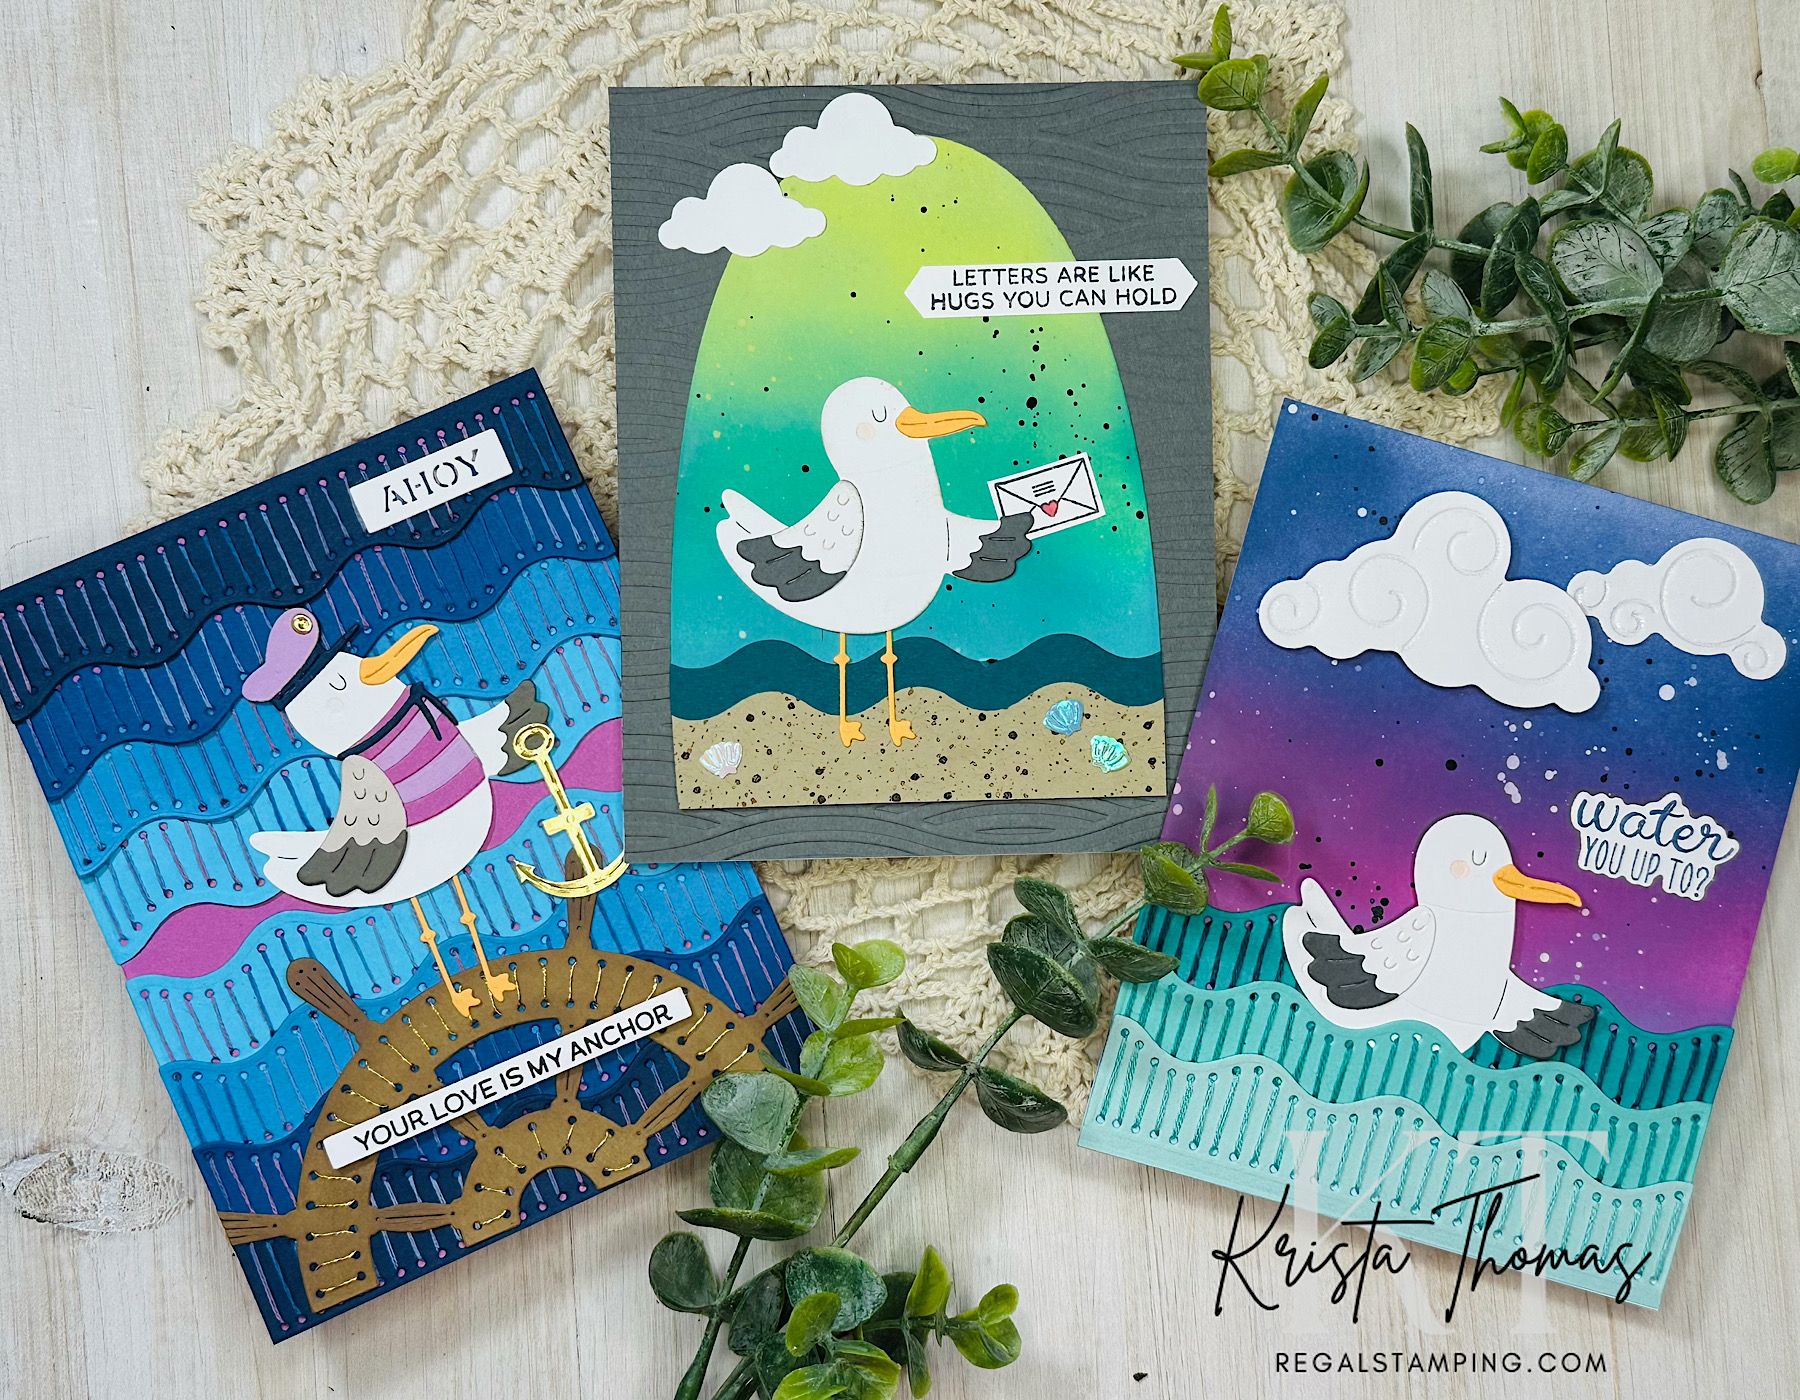
There’s just something magical about waves, seashells, and sea creatures—it’s my kind of creative escape. I’ve already set sail on a few crafty adventures and made three cards that I can’t wait to share with you. Grab your snorkel (or your stitching needle!) and come take a peek!

Scenes from the ocean…
Card 1: Ahoy, Sea Captain!
There are quite a few dies included with the Stitching Die set; waves, a seagull with a captain’s hat, a ship’s helm, an anchor and more! So much creativity within one die set and for my first card, I wanted to showcase as much of the set as I could. It ended up being quite busy, but fun, nonetheless!
Let’s make it…
- Begin by die-cutting the waves with four different colors of blue, 2 of each color. I opted to add the stitching holes. My colors include turquoise, Celestial, Cosmic Sky & Indigo.
- Stitch the wavy pieces with DMC thread, #4214. This is a variegated thread which incorporated the plum color that was carried throughout the card.
- Onto a Mulberry card base, layer four waves from the top and four from the bottom, creating a color pattern of light to dark.
- Die-cut the helm in Acorn, adding the stitching lines.
- Stitch the helm with gold thread.
- Adhere helm to the bottom of the card.
- Die-cut the seagull, vest and hat and anchor. I used White, Fog, Anchor, Orchid, Mulberry, Indigo, Carrot and metallic gold.
- Piece the seagull together and adhere to the card, placing the feet on the helm.
- Adhere the anchor to the outstretched wing.
- Die cut “ahoy” from white card stock and attach at the top right of card.
- Using Nearest & Dearest (CSOM-MAR25), stamp sentiment with black ink onto white card stock. Cut with coordinating die and adhere over helm using foam dots.
Card 2: Letters are like hugs…

Notice that this card has no stitching as I omitted that portion of the die. Such versatility!
Let’s make it…
- Begin by texturing an Anchor panel (5.5” x 4.25”) using Summertime Waves embossing folder (EOM-JUN24).
- Cut an arch panel from White card stock using Arch Labels and Tag dies.
- Ink blend the arch panel using Distress Oxide inks in Twisted Citron, Lucky Clover & Peacock Feathers. Splatter with water, dabbing off the excess. Splatter with black paint and allow to dry and then adhere to the card base.
- Die cut waves from Oceanside and Fawn, omitting the stitching lines. Splatter the Fawn waves with light & dark brown inks to mimic a sandy beach. Layer the two wave pieces and adhere to the bottom of the arch panel.
- Die cut the seagull from White, Anchor and Carrot card stock. Piece together and set aside.
- With black ink and white card stock, stamp and cut a letter/envelope and sentiment using Send & Seal (CSOM-APR25). Adhere letter behind the sealgull’s outstretched wing.
- Adhere seagull to the arch panel with the feet over the sandy beach. Adhere sentiment above the seagull, off-setting it towards the right.
- Die cut two white clouds with the die from Over the Rainbow. Adhere towards the top of the arch.
- Add some shimmery seashells on the sandy beach!

Card 3: Floating the Waves
This gull looks so peaceful as it floats the ocean waves!
Let’s make it…
- Ink blend onto a white panel measuring 5.5” x 4.25” using Distress Oxide inks in Chipped Sapphire and Seedless Preserves, blending completely where the two colors collide.
- Splatter with white and black paint and allow to dry.
- Die cut three waves with Ahoy Matey, (June’s Stitching Die of the Month) from Seaside, Waterfall and Teal Topaz card stocks. Stitch with DMC threads #’s 959, 3812 & 3808. Set aside.
- Die cut the seagull from White, Anchor & Carrot card stock. Assemble, omitting the legs. Color the gull’s cheek with a soft pink marker. Set aside.
- Die cut two clouds from white card stock using Sun and Clouds die set. Trace the swirls on the clouds with Silver Glitter Pen. Set aside.
- Stamp sentiment on white card stock with Chipped Sapphire ink, using Water You Up To? (CSOM-JUN23 and now retired) Cut sentiment with coordinating die.
- To begin assembly, layer the three waves from light at the bottom to darkest at the top. Slip seagull in between the top two waves, glue in place and adhere waves and bird to card base.
- Adhere the small cloud in the upper right corner.
- Add foam dots to the back of large cloud and adhere to the left of small cloud.
- Use glue to adhere sentiment in the sky between the small cloud and the seagull.
That’s it for my Scenes From the Ocean post! I had so much fun perusing my stash and finding ways to incorporate items from previous Spellbinder clubs and purchases. When the rest of my club pieces arrive, I’ll be in FULL ocean mode and I can hardly wait!
If you’ve been following me for a while, you’ll already know that the ocean and anything tropical is what makes my heart go pitter patter. I shared a tropical card in this previous post: In Love with my Pineapple Stitching Die and a couple ocean scenes in this Sunset Silhouettes post.
Thanks for visiting today and I hope you enjoyed seeing my “scenes from the ocean”!
Until next time,
~Krista

Discover more from Regal Stamping
Subscribe to get the latest posts sent to your email.