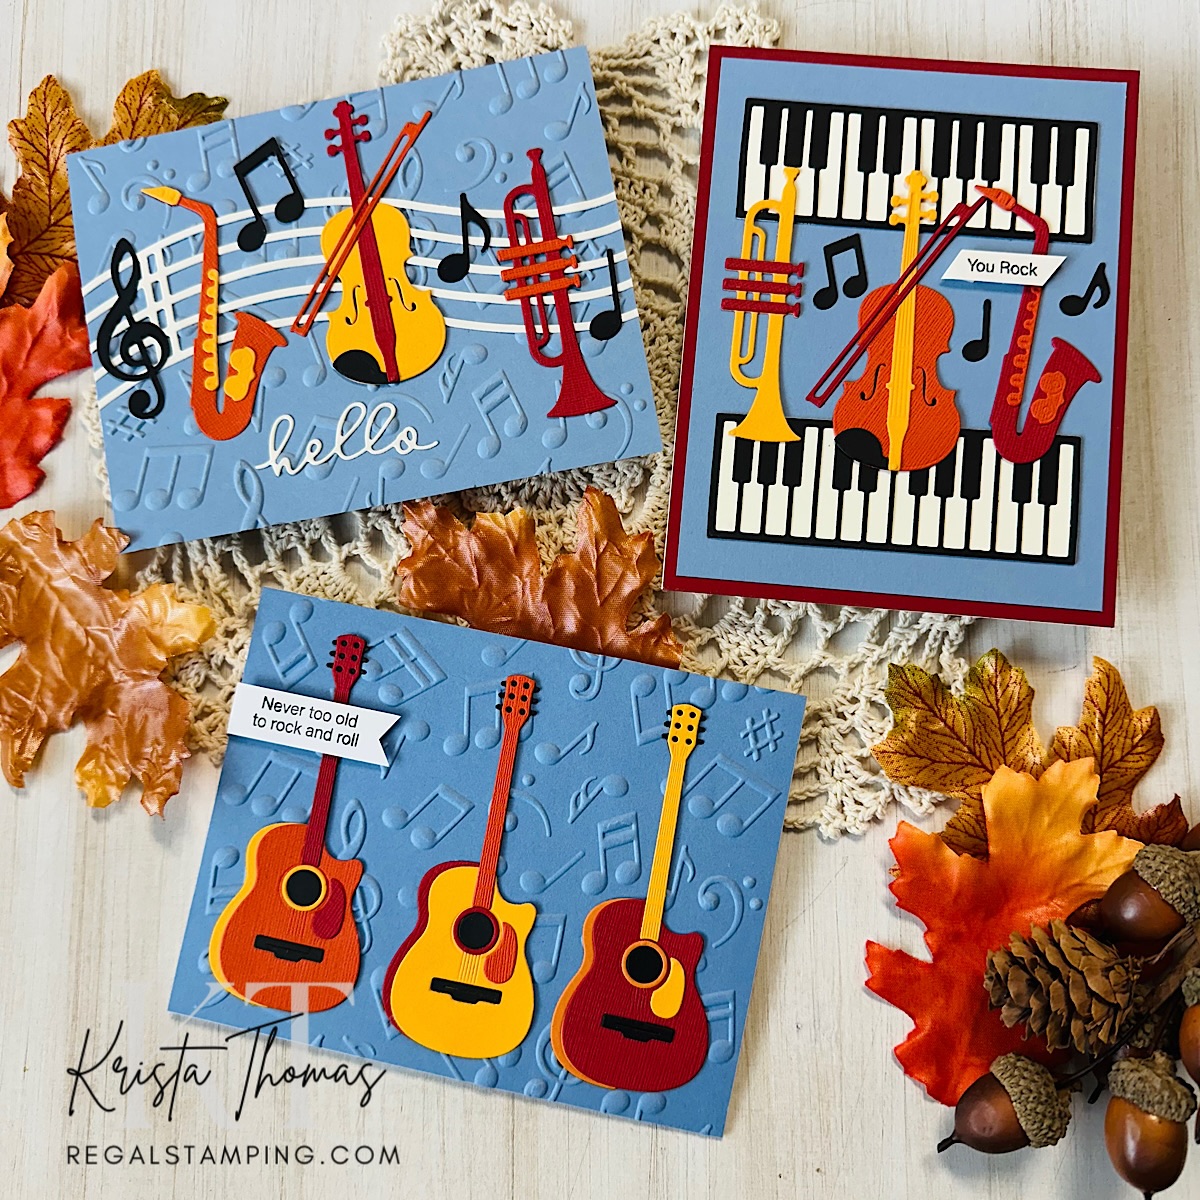
I’m truly excited to be sharing cards made with Bibi’s Musical Notes Collection from Spellbinders! There’s much to love about this suite of products, including the pun-filled sentiment stamps and the pop-up spiral stave die that turns every card into a “wow” factor!
For this set of three cards, I paired a warm palette of red, orange and mango with a cool-toned blue background for a striking contrast.
The products I used are all from Bibi’s Musical Notes Collection & are listed below:
- Musical Notes 3D Embossing Folder
- Family Musical Mix Greetings (stamp set)
- Mini Guitar Etched Dies
- Mini Musical Instruments Etched Dies
- Musical Notes & Stave Pop-Up Etched Dies
Let’s Make Some Guitars!
Using the Mini Guitar Etched Dies from Bibi’s Musical Notes Collection

With a color scheme picked out and card stocks chopped and ready, I began a die-cutting session which involved cutting each instrument out from red, orange and mango.
By keeping the pieces for each instrument in separate containers, it was a simple process to mix and match the individual colors and create a trio of coordinating guitars.
After texturing a blue card stock panel with Musical Notes 3D Embossing Folder, I placed the guitars in a row and glued them into place.
I used a sentiment from Family Musical Mix Greetings, stamping it onto white card stock. After notching the right end, I popped it up on the upper left side of the card. My finished card front was adhered to a folded white card base. On the inside, I stamped “happy birthday” right in the center. This will be visible after I add the pop-up piece, explained next.
With another blue panel of card stock, I placed the spiral stave pop-up die in the center of the panel and ran it through my die-cutting machine. This piece was placed inside the finished guitar card and adhered over the stamped “happy birthday” sentiment. I was careful to only add glue at the edges of the blue panel, so as not to glue down the pop-up portion!
With the pop-up panel glued into place, I carefully placed a drop of glue on the very center of the spiral and then carefully closed the card. After gently rubbing over the front of the card and insuring that the glue was set, I carefully opened the card, watching the spiral open up as I did! How cool!! 🙂
Decorating the spiral with musical notes was super quick and easy, resulting in a colorful pop-up surprise! I’m in awe of Spellbinders ingenuity!!
Let’s Jazz!
Using Mini Musical Instruments from Bibi’s Musical Notes Collection
The next card was made in the same fashion as the guitar card, only this time I used the Mini Musical Instruments Etched Die set. These include a saxophone, violin, trumpet and keyboard.

With my original color scheme in play, I jammed out a fresh set of die-cut instruments and pieced them together. Once I arranged them on a bold blue card front, I ditched the textured background—it felt cleaner and let the instruments take center stage. To top it off, I stamped the perfect mic-drop sentiment: “You rock.” And just like that, this card was ready to steal the show!
Let’s Play the Part
Using Musical Notes & Stave Pop Up & Mini Musical Instruments

After finishing my second card, I had a pile of extra instruments on my desk—too good to waste! So, I decided to strike up one more tune. This time, I gave the blue background some texture and added a musical staff dancing with notes. Nestling the instruments in among the melody, I topped it all off with a die-cut “hello” for the perfect finishing touch.
The products from Bibi’s Musical Notes Collection are so fun to create with and I have all sorts of ideas floating in my head!
Until next time,
~Krista
This post contains affiliate links. If you click on one of my links and make a purchase, I will receive a small commission from that company, at no extra cost to you.

Discover more from Regal Stamping
Subscribe to get the latest posts sent to your email.